Have you ever imagined plucking a fresh green bottle gourd from your own garden? Known as lauki in India and calabash in many other countries, bottle gourd is among the easiest vegetables to grow at home. It’s light, nutritious, and grows quickly in the right conditions.
When I first planted bottle gourd on my terrace, I was surprised by how fast it climbed the trellis and started producing fruits. Within weeks, I had enough gourds to share with neighbors. That’s the beauty of this plant—it gives back more than you expect.
In this blog, I’ll share everything you need to know about how to grow bottle gourd at home successfully, whether you live in a city apartment or have a backyard garden.
Why Grow Bottle Gourd?
Bottle gourd is a nutrient-rich vegetable packed with vitamins, minerals, and water content. It’s great for digestion, hydration, and weight management. Beyond health, growing it at home ensures:
- Fresh, chemical-free harvests.
- Cost savings compared to buying from stores.
- A rewarding gardening experience, especially for beginners.
- Beautiful greenery, as the climber doubles as a natural shade.
Choosing the Right Spot
Bottle gourd is a warm-season crop. For best growth, choose a spot that gets at least 6–8 hours of sunlight daily.
- Backyard gardens and terrace gardens are ideal.
- If you’re in colder regions like Canada or the USA, start seeds indoors and transplant them after the last frost.
- Ensure the soil or containers provide good drainage to prevent waterlogging.
Also Read: Clematis: The Climbing Vine That Gives You a Wall of Blooms
Soil Preparation
Bottle gourd thrives in loose, fertile, and well-drained soil. The ideal pH is between 6.0 and 7.5.
- Mix garden soil with compost or well-rotted manure before planting.
- If growing in pots, choose a container at least 12–15 inches deep.
- Add organic manure or vermicompost every month to keep the soil nutrient-rich.
Planting Bottle Gourd Seeds
There are two main methods:
1. Direct Sowing
- Soak seeds in water overnight to speed up germination.
- Plant 2–3 seeds in each spot, about 1 inch deep.
- Thin out weaker seedlings, keeping the healthiest one.
2. Transplanting Seedlings
- Start seeds indoors in small pots.
- Transplant them once they have 3–4 true leaves.
- This method works best in areas with short growing seasons.
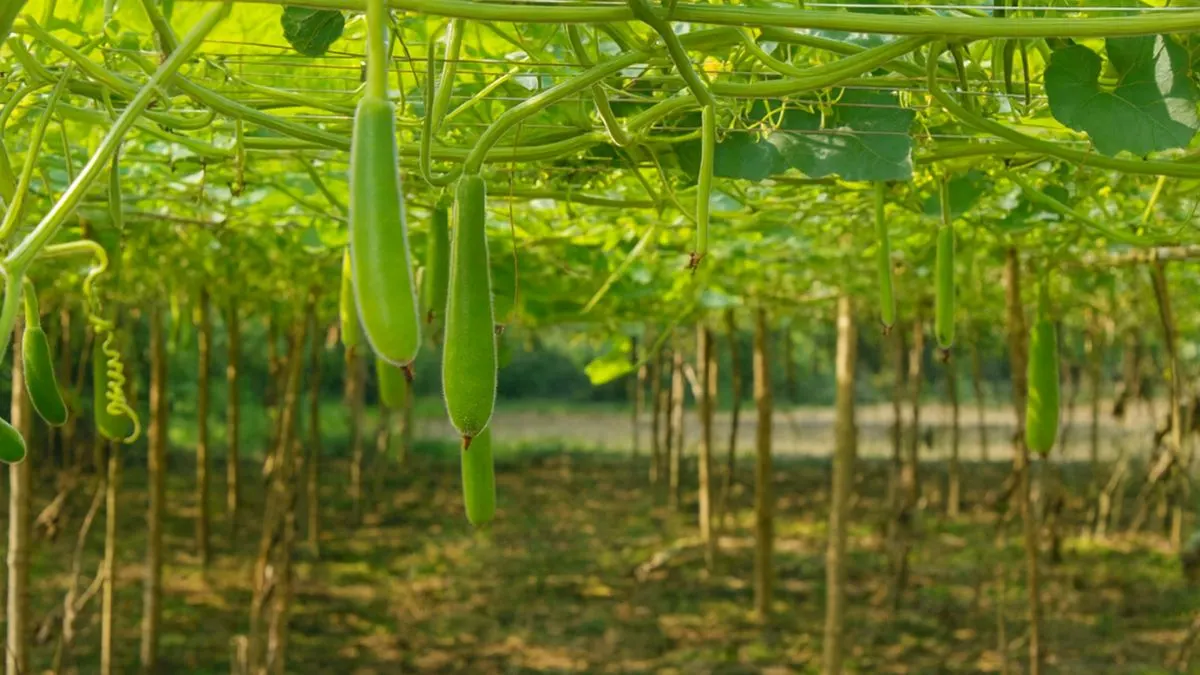
Providing Support: Trellis Setup
Bottle gourd is a climbing plant and needs strong support.
- Build a bamboo, metal, or wooden trellis.
- Train the vines to climb upward, allowing proper air circulation.
- This prevents fruits from touching the soil, reducing rot and pest attacks.
When I built a simple bamboo frame for my plant, not only did it support the growth, but it also added a green canopy that cooled my terrace in summer.
Also Read: Football Lily: The Explosive Flower That Blooms Like Fireworks!
Watering Requirements
Bottle gourd loves moisture but not soggy roots.
- Water deeply 3–4 times a week during the growing stage.
- Reduce watering once the plant starts fruiting to avoid splitting.
- Mulching around the base helps retain soil moisture.
Fertilization Tips
Feed your plants regularly for healthy growth.
- Use nitrogen-rich fertilizers in the early stages for leafy growth.
- Once flowering starts, switch to potassium-rich fertilizers to boost fruiting.
- Organic options like compost tea, bone meal, or seaweed extract are excellent.
Pest and Disease Management
Common pests include aphids, fruit flies, and beetles. Diseases like powdery mildew and downy mildew may also appear.
Prevention tips:
- Spray neem oil once a week.
- Remove infected leaves immediately.
- Avoid overcrowding plants to improve airflow.
Harvesting Bottle Gourd
You can start harvesting it 2–3 months after sowing.
- Harvest when the fruits are young and tender, about 10–12 inches long.
- Overripe gourds become hard and lose flavor.
- Regular harvesting encourages more fruit production.
Also Read: Evergreen Flowering Vines That Will Transform Your Garden Walls
Quick Guide to Growing Bottle Gourd
Factor |
Requirement |
Sunlight |
6–8 hours daily |
Soil Type |
Loose, fertile, well-draining |
Container Size |
12–15 inches deep |
Watering |
3–4 times a week, reduce after fruiting |
Support |
Strong trellis or bamboo frame |
Harvesting Time |
60–75 days after sowing |
Personal Experience
In my first season, I planted bottle gourd in a grow bag with compost-rich soil. I trained the vines over a bamboo trellis, and within two months, I was amazed by the number of flowers and fruits it produced. The homegrown gourds were much fresher than the ones at the market, and I even experimented with recipes like lauki soup and bottle gourd halwa.
Growing bottle gourd at home is a fulfilling experience. With the right sunlight, soil preparation, regular watering, and strong support, you’ll enjoy a continuous harvest of this versatile vegetable.
Whether you’re in India, the USA, or Canada, you can grow bottle gourd in your backyard, terrace, or even large containers. If you’re looking for a vegetable that’s easy, nutritious, and rewarding, start with bottle gourd—it will not disappoint you.


